
Augusto the ghost – Free Pattern

17/11/2020
About this pattern
Here it is at last… my very first free pattern on the site! And of course, it had to be Augusto the ghost 👻. He’s small, friendly, and a little clumsy…and full of love. Once I have a bit more time, I’ll start uploading the ones I already have on my Instagram @onpoki so they’re easier to find.
:: Meet Augusto, the Love Ghost ::
Not all ghosts are scary. Some, like Augusto, only want to spread love.
This little ghost was born on a cold winter afternoon, while I was crocheting without any clear plan and my heart was asking for softness. He began as a round, friendly shape, but slowly gained personality… shiny little eyes, a shy smile… and a red heart he decided to carry everywhere.
Augusto is small, soft, and full of good intentions. He wanders around the world looking for people who need a bit of comfort, a tiny crocheted wink, a mini burst of tenderness. He likes hiding between books, hanging from backpacks, or sitting next to the mate. And even if he disappears for a little while, he always comes back… because this is the only ghost who will never ghost you.
I truly hope you like him ❤
Prefer a printable version?
If you’d like to support my work… or if you prefer having a nicely formatted PDF with step-by-step photos, you can get it for a symbolic price directly from my website.
Your support helps me keep creating free patterns for the community 💛
Thank you!
You can also support my work with a small tip later in the pattern ☕
Materials, tips and instructions
Yarn and hook
Little Augusto was made with Aran weight yarn (AKA medium / 4 / 10 ply / worsted / afghan) with a 3 mm crochet hook (US C2 / UK-CAN 11).
The heart was made with DK weight yarn (AKA double knitting / light / 3 / light worsted / 8 ply) with a 2 mm crochet hook (US B/1 / UK-CAN 14). Of course you can make it with the same one you made Augusto with, but it will not be so tight or small.
With the materials I used I got a ghost 5 cm (2 inches) wide and 10 cm (4 inches) tall.
You can use any weight of yarn when making your amigurumi, provided you choose an appropriate hook size for that yarn weight, the only thing that will change is the final size. Just make sure there are no holes in between the stitches. This usually happens when an incorrect crochet hook is used.
Colors
White (Aran weight): Approximately 23 gr
Red (DK weight): Approximately 1 gr
Pink (Aran weight): Just a little bit to make the blush.
Black (I used embroidery thread): Almost nothing, to make the mouth.
The rest…
Eyes: I used 6 mm Safety eyes.
Filling: Less than 5 grams of polyester fiber (wadding, pillow filling).
Yarn needle: To attach the parts.
Row counter: It will really help you to keep track of how many rounds you have worked… Or you can simply use a paper and a pen… If you are easily distracted, like me, I really recommend you to get one.
Stitch markers: When making amigurumis in a spiral (continuous rounds) it is pretty easy to lose track of the beginning of the round, so I strongly recommend using any kind of stitch markers, bobby pins or a scrap of contrasting yarn will work perfectly fine.
Optional:
Wire / toothpick: To attach the heart to the head. you can also do it by making a few stitches, but it doesn’t stay that stable.
Glue: To attach the heart to the wire / toothpick (if you use it).
Abbreviations
MR= Magic Ring – crochet n single crochet stitches into the adjustable loop.
sc = Single crochet stitch (double crochet stitch in UK and Australia).
inc = Increase – crochet two single crochet stitches in the same stitch.
dec = Decrease – crochet two stitches together using the invisible decrease method.
hdc = Half double crochet (half treble stitch in UK and Australia).
ss = Slip Stitch
Extra instructions
- Brackets [ ]
Repeat the instructions inside the brackets the number of times indicated by the number at the end.
Example: [6 sc, 3 inc] x6 → Repeat that combo 6 times. (And yes, 3 inc means 1 increase in each of the next 3 stitches.) - Braces { }
When you see stitches between these symbols, it means that we need to work those in the same stitch.
Example: {3 sc}= do 3 single crochets in the same stitch. - Parentheses ( )
The number inside the parentheses is the number of stitches you should have at the end of the round.
Example: [2 sc, 2 inc] x2 (12) → You should have 12 stitches total. - Asterisks * *
Inside the asterisks you will find some extra information for the correct realization of the item.
Let’s make Augusto! (free ghost amigurumi pattern)
*This pattern is made in a continuous spiral, unless otherwise stated, so you do not need to close every round at the end. I strongly recommend that you use some type of marker to mark the beginning of each round so you don’t get lost.*
:: Base ::
*Using the WHITE color yarn*
1) MR of 6 st (6)
2) 6 inc (12)
3) [1 st, 1 inc] x 6 (18)
4) [2 st, 1 inc] x 6 (24)
5) [5 st, 1 inc] x 4 (28)
Fasten off and leave a long tail to attach it to the body -Image 1-.

:: Little arms x2 ::
*Using the WHITE color yarn*
1) MR of 6 st (6)
2-3) 6 st (6)
Make 1 CH, flatten and close the opening with 3X -Images 2-. Fasten off leaving a long tail for joining the arms to the body. It will look like in image 3.


:: Body (tangible) of Augusto ::
*Using the WHITE color yarn*
1) MR of 6 st (6)
2) 6 inc (12)
3) [1 st, 1 inc] x 6 (18)
4) [2 st, 1 inc] x 6 (24)
5) 24 st (24)
6) [3 st, 1 inc] x 6 (30)
7) 30 st (30)
8) [4 st, 1 inc] x 6 (36)
9) 36 st (36)
10) [7 st, 1 dec] x 4 (32)
11-14) 32 st (32)
:: Face details ::
Before finishing with the body we are going to apply the details of the face so that it is more comfortable to do them.
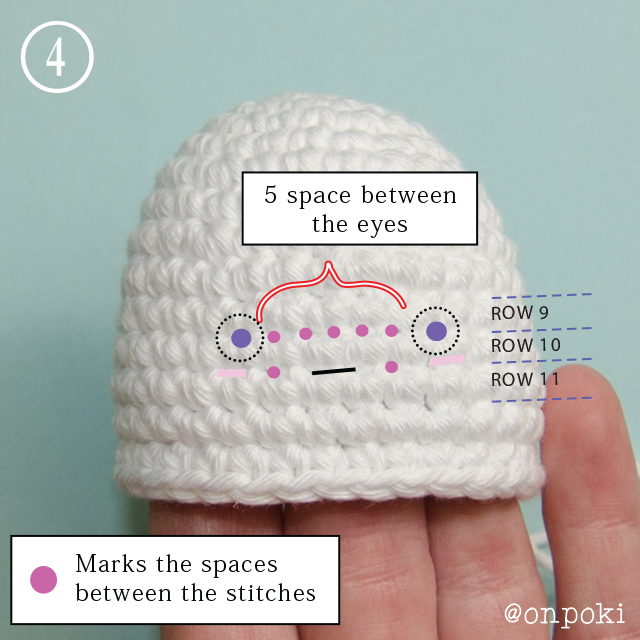
Eyes: They will go between the rows 9 and 10. Leaving 5 spaces between them -Images 4 and 6-.
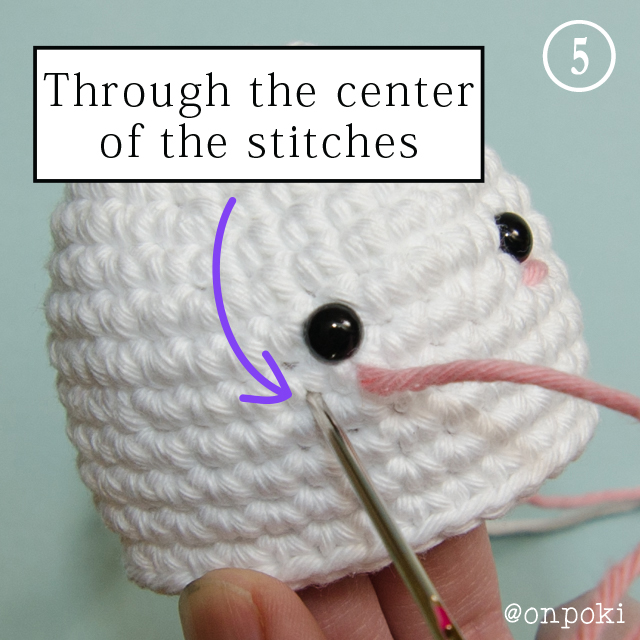
Cheeks: Make them with the pink yarn. Between rounds 10 and 11, leaving 4 spaces between them -Image 5-. Insert the needle with the pink colour yarn from inside out, just under the eye, and insert it again a space away.
* To make it super even, if you have that “little problem” like me, in one of the cheeks you might need to insert the needle through the centre of the stitch (instead of doing it between the stitches) * -Images 4, 5 and 6-.
Mouth: Using the black yarn. Between the rows 10 y 11, between the cheeks and will be one stitch long -Images 4 and 6-.

:: Let’s continue with the body ::
15) 32 st (32)
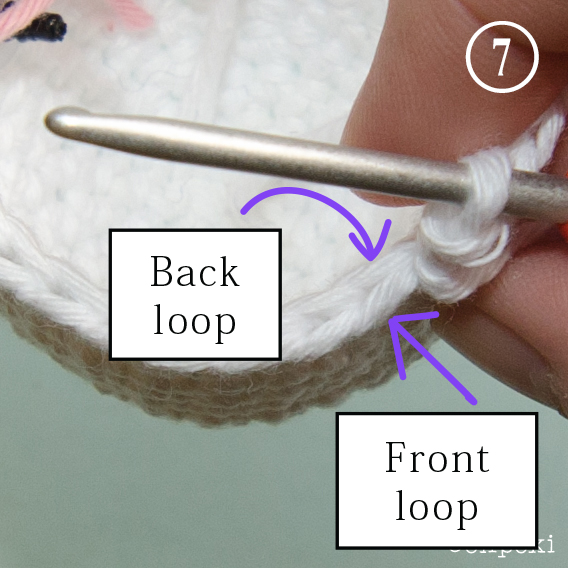
Work all the stitches of the next round in the front loop only -Image 7- * Back loop and Front loop *.
16) 32 st (32) It should look like the image 8.

Continue working all stitches in both loops.
17) 32 st (32)
Before making Augusto’s border we are going to join the base to round 16 where we left the back loop in sight. Making stitches as seen in images 9. Do not forget to fill your ghost before closing it all, be careful not to overfill it so that it does not lose the shape.

:: Making the border and attaching the arms ::
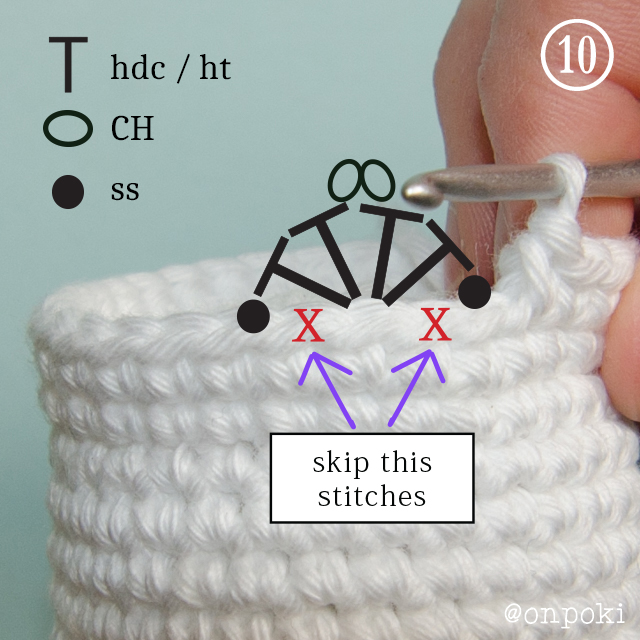
18) [Make 1 ss, skip the next stitch, <2 hdc , 2 CH, 2 hdc>, skip the next stitch] x 8 *We will need to make the last ss on the first stitch of this row *
You should have in total 8 peaks -Images 10 and 11-

Join the arms to the sides of the body between rounds 12 and 13 -Image 12-.

Augusto is done… Now to make the heart!
:: Heart ::
*Using the RED color yarn (DK yarn or thinner than the one you used to make Augusto)*
:: Upper part x2 ::
1) MR of 6 st (6)
2) [1 st, 1 inc] x 3 (9)
3) 9 st (9)
Fasten off, just the first one we finish, leaving a little of yarn to close the small hole that we will have between the 2 pieces when we join them together -Image 13-.

:: Joining the upper parts ::
*We will need to make the first stitch of next round in the last stitch of the first upper part we made -Image 14- *

4) Make 9 st in the first upper part and 9 st in the second one (18) -Image 15-

Make 2 stitches closing the little hole between both pieces -Image 16- using the tail we left at the beginning when we fasten off the first piece.

5) 4 st, 1 dec, 7 st, 1 dec, 3 st (16)
6) [2 st, 1 dec] x 4 (12)
Fill
7) 6 dec (6)
We are going to close the heart by taking the front loop of each of the 6 stitches with the help of a yarn needle -Image 17-, BUT BEFORE PULLING THE THREAD to close it completely, we have 2 options.

:: First option: Joining the heart with a Heart attached with wire (or toothpick, or whatever you have on hand) ::
* Important, once we put the glue on the wire we will have to do all the other steps BEFORE it dries *
- Put a little glue on the wire, as shown in image 18, and insert it in the heart.
- Pull the thread to finish closing the heart -Image 19-.
- Lose the thread inside the heart inserting just where the wire enters… So the thread stays stuck with the glue that we put on the wire -Image 20-.
- If it is necessary, cut the wire a little more -Image 21-, so it enters the body without pushing the filling down too much.
- Introduce it through the magic ring that we made at the beginning -Image 22-.


:: Second option: Heart joined with the thread ::
- Simple… Finish closing the heart completely -Image 23-
- With the help of a yarn needle insert the tail of thread through the magic ring that we made at the beginning -Image 24-
- Pull the thread out from the body (it can be from the back of the body or at the base), pull the thread so that the heart is firmly on the head, but taking care not to deform the body. Tie a knot to secure it and lose the thread inside the body.


That’s it!
Your little Augusto is ready!
I hope you had fun making him. ^_^

I would love to see how they look! If you want, you can share it on Instagram or Facebook tagging me with @onpoki and/or with the hashtag #onpoki.
Follow me on Instagram or Facebook for more free amigurumi patterns.
Thank you very much for choosing one of my patterns. You made me really happy ^_^
With love, Paula…❤
If you enjoyed making this pattern and would like to support my work, you can do so here ☕

Copyright information of this pattern
© 2020 ONPOKI – Paula Fuentes – All rights reserved. This pattern is FOR PERSONAL USE ONLY! The pattern (or parts of it) may not be reproduced, distributed or resold, translated, published, altered, shared or posted (for sale or free) over the internet or offline. If you think someone might be interested, please direct them to my site or one of my stores.
You are welcome to sell items from my PDF patterns provided that they are handmade by yourself, and you give credit to the designer.
Please include a note about the item being an “Onpoki design” on the tag (at a craft fair) or/and a link to my shop “onpoki.com” when you sell these items on Internet.
THANK YOU FOR MAKING ONE OF MY PATTERNS AND FOR RESPECTING MY WORK.
You can find more free patterns here! I hope you like them ^_^