
09/07/2022
There are 2 things I love about Autumn, and those are rainy days (when I can stay warm inside my house, with a cup of coffee in my hand, enjoying the sound of the rain, obviously), and the change of colours in the trees. The landscapes become a work of art with brush strokes of all colours. And every time I see these leaves, they remind me of those magical walks on autumn afternoons. I hope you like them!
Support my work – Get the PDF
If you’d like to support my work… or if you prefer having a nicely formatted PDF with step-by-step photos, you can get it for a symbolic price from my Ravelry or Etsy shops. Links below 💛


Your support helps me keep creating free patterns for the community 💛
Thank you!
:: Crocheted Autumn Leaf ::
Materials, tips, and instructions.
– Yarn and hook
This leaf was made with DK weight yarn (AKA double knitting / light / 3 / light worsted / 8 ply) with a 2.5 mm (UK 12 – US C/2) crochet hook.
With the materials that I use I obtained a leaf of 5 cm (2 in) wide and 5 cm (2 in) high.
You can use any weight of yarn when making your amigurumi, provided you choose an appropriate hook size for that yarn weight, the only thing that will change is the final size. And always make sure there are no holes in between the stitches. This usually happens when an incorrect crochet hook is used.
– The rest…
Tapestry needle: To hide the yarn tails.
Stitch markers: I only used it on the second round. On the third round it is easy to recognize the end because it is where the petiole starts
– Abbreaviations
MR: Magic ring / Magic loop
st: Stitch
ch: Chain
ss: Slip stitch
sc: Single crochet / Double crochet
hdc: Half double crochet / Half treble
dc: Double crochet / Treble
tr: Treble / Double treble
inc: Increase
dec: Dec
I will also explain to you how to make the Picot stitch.
– Extra instructions
- Symbols of inequality < >
When you see stitches between these symbols, it means that we need to work those in the same stitch.
Ex: <2 sc,1 hdc> means that we need to do 2 single crochet and a half double crochet in the same stitch. - Parentheses ( )
The number inside the parentheses is the number of stitches you should have at the end of the round.
Ex: [2 sc, 2 inc]*2 (12) means that we should have 12 stitches in total at the end of that round. - Curly brackets { }
Inside the braces you will find some extra information for the correct realization of the item.
{This pattern was written using US terms}
:: Pattern ::
Using the colour of yarn you prefer*
1) MR 6 sc (6)
Remember that the stitches written inside these symbols < > will have to be done in the same base stitch.
2) sc inc, <1 sc, 1 hdc>, <1 hdc, 1 dc>, <1 dc, 1 hdc>, <1 hdc, 1 sc>, sc inc (12) At the end of this round it should look like Image 1.

{The next round I am going to separate it by group of stitches to make it easier to follow}
3)
- First we are going to make the petiole.
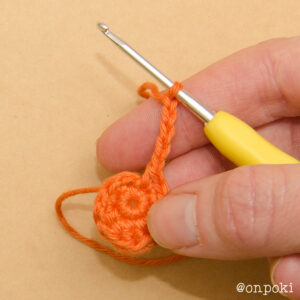
Make 5 ch, starting on the second chain from the crochet hook (Image 2) work 4 sc on the chains. It should look like Image 3.
Join to the next stitch with a ss (Image 4).
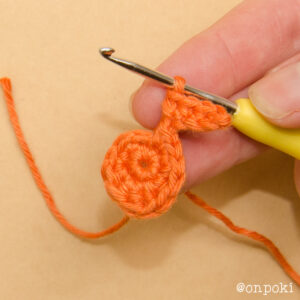


- In the next stitch <3 tr, Picot Stitch*, 1 hdc> (Image 8)
* Picot Stitch: To make a Picot Stitch we are going to make 3 ch (Image 6) and then finish the point we are going to make a ss in the second chain from hook (Image 7).


- In the next base stitch (ATTENTION: This stitch may be half hidden under the stitches we just made) <1 hdc, 1 dc, 1 tr> (Image 9)
- In the next base stitch <1 tr, Picot Stitch, 1 tr, 1 dc> (Image 10)
- In the next base stitch <1 sc, 1 hdc> (Image 11)


- In the next base stitch <1 dc, 1 tr, Picot Stitch> (Image 12)
- In the next base stitch <1 tr, 1 dc> (Image 13)
- In the next base stitch <1 hdc, 1 sc, 1 ss> (Image 14)
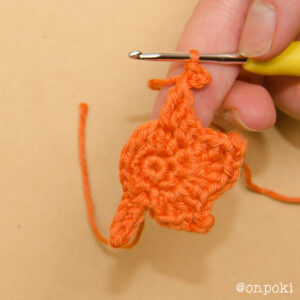


- In the next base stitch <1 dc, 1 tr, Picot Stitch, 1 tr> (Image 15)
- In the next base stitch <1 tr, 1 dc, 1 hdc> (Image 16)
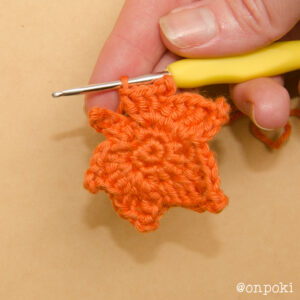
- In the next base stitch <1 hdc, Picot Stitch, 3 tr> (Image 17)
- In the next base stitch 1 ss, slip stitch and cut the yarn leaving enough to attach it to wherever you need or enough to just hide it inside the leaf.


That’s it!
You finished your little leaf.
I hope you had fun making it.
^_^

I would love to see how they turned out! Please share it on Instagram and/or Facebook using the tag @onpoki and the hashtag #onpoki, so I can see your creation.
Thank you so much for choosing one of my patterns. You made me really happy.
With love, Paula…
Copyright information of this pattern
© 2022 ONPOKI – Paula Fuentes – All rights reserved. This pattern is FOR PERSONAL USE ONLY! The pattern (or parts of it) may not be reproduced, distributed or resold, translated, published, altered, shared or posted (for sale or free) over the internet or offline. If you think someone might be interested, please direct them to my site or one of my stores.
You are welcome to sell items from my PDF patterns provided that they are handmade by yourself, and you give credit to the designer.
Please include a note about the item being an “Onpoki design” on the tag (at a craft fair) or/and a link to my shop “onpoki.etsy.com” when you sell these items on Internet.
THANK YOU FOR CHOOSING ONE OF MY PATTERNS AND FOR RESPECTING MY WORK.
You can find more free patterns here! I hope you like them ^_^